

Migrating Cilium from Legacy iptables Routing to Native eBPF Routing in Production

At Deezer, we maintain both cloud and on-premise Kubernetes clusters (a few thousands of physical cores) in our data centers in Paris.
Since we’re responsible for these clusters, we need to choose the technical stacks that run our platform (hardware, OS, kubernetes distribution, etc.) To act as the CNI plugin (basically, the component that creates the containers internal network), we chose cilium, a newly graduated CNCF project.
Unfortunately, running our own clusters rather than just managed instances comes with the risk of human error. The goal of this blog post is to share our experience dealing with a cilium misconfiguration on our production Kubernetes clusters.
Even though this incident had no impact on our end users (we caught it soon enough to fix it), it could have had dire consequences.
We’ll retrace the steps that led us to realize that we didn’t set up our cilium CNI plugin correctly, and how we fixed it in production.
Symptoms
After adding nodes and real production workload on new Kubernetes clusters, we started to notice some abnormal CPU consumption. cilium-agents containers were taking an average of 2 cores on each node, with a lot of variations (up to 5 cores peaks). This was surprising.
We tried to find what was causing so much CPU usage, and while checking the configuration of cilium, this is what we found:
kubectl -n cilium exec -it cilium-aaaaa -- cilium status
[...]
Host Routing:           Legacy
Masquerading:           IPTables [IPv4: Enabled, IPv6: Disabled]
[...]
And it was odd…
But let’s rewind a bit.
cilium: iptables vs eBPF
While iptables has been the default “routing stack” for most “CNI plugins” since the beginning of Kubernetes, it’s known to be really poor at handling even not-so-big clusters (> 1000 pods).
The number of iptables rules tends to increase exponentially, and with it, your CPU usage. At some point, walking the list takes all the CPU of a given node and it becomes unresponsive.
And that’s pretty bad ;-P.
This is one of the many reasons we chose cilium as a CNI plugin over other implementations: it features an elegant solution for this issue by replacing iptables rules with eBPF kernel programs.
Note: aside from eBPF (and cilium), there are other solutions to get rid of iptables for networking in Kubernetes. But we won’t get into more details in this article.
For some reason, while the cilium Helm chart is supposed to install the CNI plugin in eBPF native mode by default when the host supports it, this wasn’t the case here. We had everything cilium needed (see System Requirements documentation), both the recent kernel (6.2) and the enabled kernel modules.
We introduced eBPF-based host-routing in Cilium 1.9 to fully bypass iptables and the upper host stack, and to achieve a faster network namespace switch compared to regular veth device operation. This option is automatically enabled if your kernel supports it. To validate whether your installation is running with eBPF host-routing, run cilium status in any of the Cilium pods and look for the line reporting the status for “Host Routing” which should state “BPF”.
We still don’t know why native routing mode wasn’t enabled by default, but the logs were pretty clear that it was not and what to do to prevent this:
kubectl -n cilium logs cilium-aaaaaa
[...]
level=info msg="BPF host routing requires enable-bpf-masquerade. Falling back to legacy host routing (enable-host-legacy-routing=true)." subsys=daemon
So, we deduced that the only thing we needed in order to fix the issue was to change the cilium chart’s value and set bpf.masquerade to true:
[...]
  kubeProxyReplacement: strict
+ bpf:
+  masquerade: true
[...]
Problem
The problem here was obviously more complicated than just changing the value of a chart, or else there would be no reason to write a blog post about it!
Since a lot of apps and traffic were already running in the dev and prod misconfigured clusters, we didn’t want to:
- cause an interruption for the hosted apps,
- risk finding ourselves in some inconsistent state during the change from iptables to ebpf.
So, we had to find a way to only change some nodes, and check if it was possible to have apps running on nodes with iptables routing and other nodes with eBPF routing (in terms of internal/external connectivity).
Preparing a sandbox cluster
To achieve this, we recreated a sandbox cluster identical to the misconfigured ones.
This cluster had only 5 nodes (3 masters, 2 workers) but it was enough to run some basic tests initially. The first thing to check was if the sandbox cluster was indeed misconfigured (aka in legacy routing).
kubectl -n cilium exec -it cilium-bbbbb -- cilium status
[...]
Host Routing:           Legacy
Masquerading:           IPTables [IPv4: Enabled, IPv6: Disabled]
[...]
Then, we checked that the cluster was correctly set up. cilium gives various tools to check connectivity across the cluster, which is really handy.
First, you can launch a test from the CLI, which in turn deploys some containers and runs internal/external tests:
➜  ~ cilium -n cilium connectivity test
ℹ️  Monitor aggregation detected, will skip some flow validation steps
✨ [sandbox] Deploying echo-same-node service...
✨ [sandbox] Deploying DNS test server configmap...
✨ [sandbox] Deploying same-node deployment...
✨ [sandbox] Deploying client deployment...
[...]
✅ All 32 tests (265 actions) successful, 2 tests skipped, 0 scenarios skipped.
Then, there is also a command called cilium-health in the cilium Pods, which has a status command. cilium sends periodic probes to all Kubernetes clusters nodes and reports back latency.
kubectl -n cilium exec -it cilium-ccccc -c cilium-agent -- cilium-health status
Probe time:   2023-09-12T14:47:03Z
Nodes:
  sandbox-02 (localhost):
    Host connectivity to 172.31.0.152:
      ICMP to stack:   OK, RTT=860.424µs
      HTTP to agent:   OK, RTT=110.142µs
    Endpoint connectivity to 10.0.2.56:
      ICMP to stack:   OK, RTT=783.861µs
      HTTP to agent:   OK, RTT=256.419µs
  sandbox-01:
    Host connectivity to 172.31.0.151:
      ICMP to stack:   OK, RTT=813.324µs
      HTTP to agent:   OK, RTT=553.445µs
    Endpoint connectivity to 10.0.1.53:
      ICMP to stack:   OK, RTT=865.976µs
      HTTP to agent:   OK, RTT=3.440655ms
[...]
Finally, you can also just check the health of the Pods with the cilium status command.
➜  kubectl -n cilium exec -ti cilium-ddddd -- cilium status
[...]
Host Routing:            Legacy
Masquerading:            IPTables [IPv4: Enabled, IPv6: Disabled]
[...]
Cluster health:          5/5 reachable   (2023-09-14T12:01:51Z)
Changing a node configuration (and one only)
We were lucky because cilium 1.13 introduced a feature called per-node-config (documentation is here), which includes the possibility to deploy different configurations for cilium on a subset of nodes of our cluster.
Before that, if you wanted to test a change like what we are trying to achieve here, you had to change the cilium configuration (in cilium ConfigMap) and restart the Pods manually.
cat > cilium-fix.yaml << EOF
apiVersion: cilium.io/v2alpha1
kind: CiliumNodeConfig
metadata:
  namespace: cilium
  name: cilium-switch-from-iptables-ebpf
spec:
  nodeSelector:
    matchLabels:
      io.cilium.enable-ebpf: "true"
  defaults:
    enable-bpf-masquerade: "true"
EOF

kubectl apply -f cilium-fix.yaml

kubectl label node sandbox-05 --overwrite 'io.cilium.enable-ebpf=true'
Once the node was correctly labeled, we deleted its cilium Pod for the new configuration to be taken into account. As soon as a new cilium Pod was re-created, we checked that the correct configuration had been applied.
Notes:
- In production, you should obviously drain the node before labeling it, and reboot it afterward.
- Be sure to create the CiliumNodeConfig in the same namespace as cilium Pods or the specific configuration won’t be applied on your nodes.
➜  kubectl -n cilium exec -ti cilium-fffff -- cilium status
[...]
Host Routing:            BPF
Masquerading:            BPF   [ens18]   10.0.4.0/24 [IPv4: Enabled, IPv6: Disabled]
[...]
Cluster health:          5/5 reachable   (2023-09-14T12:01:52Z)
We could see that both “Host Routing” and Masquerading are in BPF mode.
Hurray!
Checking connectivity
We could see in the previous commands that the cluster was ok in terms of connectivity: the last line reported that all nodes were “reachable”.
We also ran the other connectivity tests we performed previously to check that everything was fine.
➜  ~ cilium -n cilium connectivity test
ℹ️  Monitor aggregation detected, will skip some flow validation steps
✨ [sandbox] Deploying echo-same-node service...
✨ [sandbox] Deploying DNS test server configmap...
✨ [sandbox] Deploying same-node deployment...
✨ [sandbox] Deploying client deployment...
[...]
✅ All 32 tests (265 actions) successful, 2 tests skipped, 0 scenarios skipped.
Curling 🥌
Some of us like the philosophy “trust but verify.” For the sake of our own curiosity, we deployed a few web servers and ran a “curl” command against them regularly to see if the cilium configuration change (without draining/rebooting) had any impact.
That’s probably not really relevant since we would never do that in production. But still, there’s no harm in being curious 😉
We applied the following manifest on our sandbox cluster:
apiVersion: apps/v1
kind: DaemonSet
metadata:
  name: simple-webserver-daemonset
spec:
  selector:
    matchLabels:
      app: simple-webserver
  template:
    metadata:
      labels:
        app: simple-webserver
    spec:
      containers:
      - name: simple-webserver
        image: zwindler/vhelloworld:latest
        ports:
        - containerPort: 8081
        imagePullPolicy: Always
Once deployed, we checked the Pods IP addresses:
kubectl get pods -o wide
NAME                               READY   STATUS    RESTARTS   AGE     IP           NODE                 NOMINATED NODE   READINESS GATES
simple-webserver-daemonset-q4h44   1/1     Running   0          3m31s   10.0.4.87   sandboxkube-05   <none>           <none>
simple-webserver-daemonset-w97pv   1/1     Running   0          3m31s   10.0.3.85   sandboxkube-04   <none>           <none>
Then, with a Pod in the cluster, we curled these Pods:
kubectl run -it --image curlimages/curl:latest curler -- /bin/sh
If you don't see a command prompt, try pressing enter.
~ $ curl https://10.0.4.87:8081
hello from simple-webserver-daemonset-g2zdw
~ $ curl https://10.0.3.85:8081
hello from simple-webserver-daemonset-65k2n
Since the web servers were reachable, we then began to change the Host Routing mode. In the curler Pod, we first ran a loop:
while true; do
  date
  curl https://10.0.4.87:8081
  curl https://10.0.3.85:8081
  echo
  sleep 1
done
We then labeled the node to change the routing policy and deleted the cilium Pod on that node for the configuration to be taken into account:
kubectl label node sandbox-04 --overwrite 'io.cilium.enable-ebpf=true'
kubectl -n cilium delete pod cilium-j6tt8
Looking from the “curler” Pod, nothing seemed to have happened.
Fri Sep 15 14:05:34 UTC 2023
hello from simple-webserver-daemonset-g2zdw
hello from simple-webserver-daemonset-65k2n

Fri Sep 15 14:05:35 UTC 2023
hello from simple-webserver-daemonset-g2zdw
hello from simple-webserver-daemonset-65k2n

Fri Sep 15 14:05:36 UTC 2023
hello from simple-webserver-daemonset-g2zdw
hello from simple-webserver-daemonset-65k2n
Looking at the logs, we could see that, at some point, cilium discovered the running web servers and added them to its Pods list:
level=info msg="Rewrote endpoint BPF program" containerID=8b7be1b032 datapathPolicyRevision=0 desiredPolicyRevision=1 endpointID=1018 identity=4773 ipv4=10.0.3.85 ipv6= k8sPodName=default/simple-webserver-daemonset-w97pv subsys=endpoint
level=info msg="Restored endpoint" endpointID=1018 ipAddr="[10.0.3.85 ]" subsys=endpoint
We did the same thing from a node with eBPF and checked that the connectivity was fine as well.
kubectl run -it --image curlimages/curl:latest curler2 -- /bin/sh
If you don't see a command prompt, try pressing enter.
~ $ while true; do
>   date
>   curl https://10.0.4.87:8081
>   curl https://10.0.3.85:8081
>   echo
>   sleep 1
> done
Fri Sep 15 14:05:34 UTC 2023
hello from simple-webserver-daemonset-g2zdw
hello from simple-webserver-daemonset-65k2n

Fri Sep 15 14:05:35 UTC 2023
hello from simple-webserver-daemonset-g2zdw
hello from simple-webserver-daemonset-65k2n

Fri Sep 15 14:05:36 UTC 2023
hello from simple-webserver-daemonset-g2zdw
hello from simple-webserver-daemonset-65k2n
Keep on curling 🥌
The previous test involved the Pods themselves, but we also ran the test against a Service, which is the Kubernetes entity that balances the HTTP calls between Pods replicas:
apiVersion: v1
kind: Service
metadata:
  name: simple-webserver-service
spec:
  selector:
    app: simple-webserver
  ports:
    - protocol: TCP
      port: 8081
      targetPort: 8081
  type: ClusterIP
We curled the newly created service from both “curlers” Pods.
while true; do
  curl https://simple-webserver-service:8081
  sleep 0.5
done

hello from simple-webserver-daemonset-65k2n
hello from simple-webserver-daemonset-65k2n
hello from simple-webserver-daemonset-g2zdw
hello from simple-webserver-daemonset-g2zdw
hello from simple-webserver-daemonset-65k2n
hello from simple-webserver-daemonset-g2zdw
To be really sure, we ran a final test by calling a URL from outside the Kubernetes cluster. We just added an Ingress pointing to this Service.
Since we had already validated that Service to Pod communication worked, there was no reason for the IngressController to Service part to be an issue, but this way we tested from “end to end”.
apiVersion: networking.k8s.io/v1
kind: Ingress
metadata:
  name: simple-webserver-ingress
spec:
  ingressClassName: haproxy
  rules:
  - host:
    http: vhelloworld.domain.tld
      paths:
      - backend:
          service:
            name: simple-webserver-service
            port:
              number: 8081
        path: /
        pathType: ImplementationSpecific
And it worked! 🥳
Deploying it in production
Testing in a sandbox is great, but we had to fix production. Most importantly, we wanted to do it in the least disruptive way.
In order to limit the impact in case something went wrong, we decided to take advantage of the fact that we had new nodes to set up.
Installing fresh new nodes directly with the right setup would allow us to progressively add traffic on the nodes with the eBPF cilium configuration instead of iptables.
If for some reason there was an issue (iptables to ebpf node communication for example), we could more easily drain the new nodes, we weren’t loaded yet.
Alternatively, if everything went fine, we could drain misconfigured nodes, fix their configuration and reboot them.
In order to do this, we started by applying the CiliumNodeConfig CRD on our clusters. Then, we installed the new nodes directly with the label io.cilium.enable-ebpf: “true”. The Pods that were started on those nodes never used iptables.
kubectl apply -f manifests/cilium-fix.yaml
We then validated that all nodes could communicate with each other. We saw no difference, regardless of their configuration (eBPF vs iptables), so we moved on and applied the fix on existing nodes.
A happy ending
There was absolutely no impact for our applications, nor our end users, thanks to the cilium feature that allowed us to apply the configuration on some nodes.
When all misconfigured nodes were drained and rebooted, it was time to check if the performance had improved.
And it had: we observed that the 2 CPUs per cilium agent consumption (with a lot of variations, up to 5-CPU peaks) dropped to only 200 millicores on average (half a CPU at peak). RAM consumption also decreased from 3 to 5 GB to less than 500 MB per instance, which is nice too.
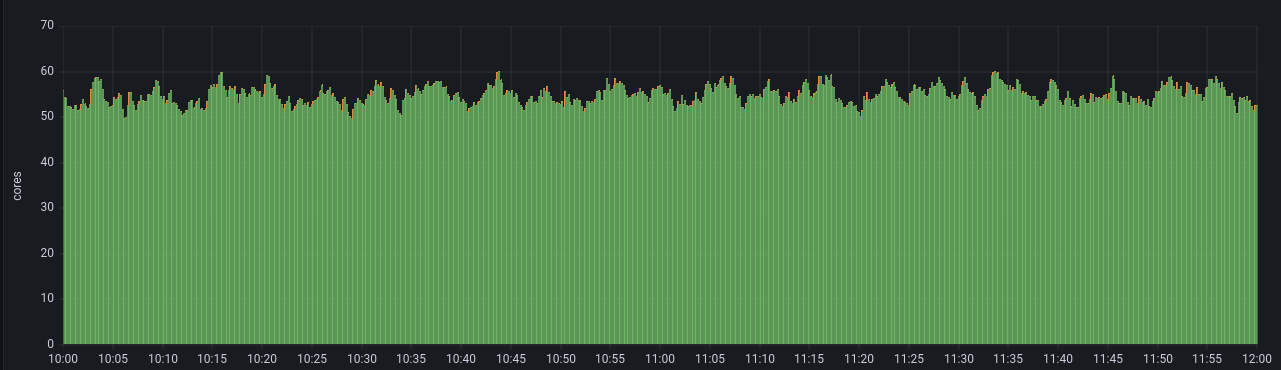
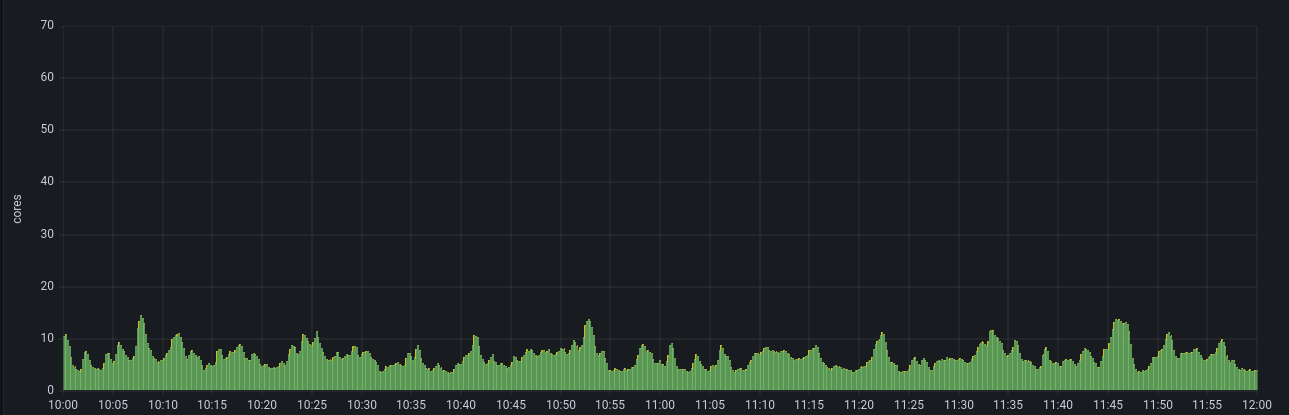
While we were expecting significant improvements in resource consumption, we certainly weren’t hoping for 10 times less.
Again, it’s not really surprising since iptables load increases exponentially with the size of the cluster. If we had not detected it soon enough, this configuration mistake could have crippled our production when traffic hit it.
Fortunately for us, cilium features and the fact we could work with our cluster in a mixed state allowed us to correct the configuration in a smooth and seamless fashion. Thanks cilium!
Additional information
- Isovalent blog — Tutorial: How to Migrate to Cilium (Part 1)
- cilium documentation — End-To-End Connectivity Testing
- cilium documentation — Troubleshooting
- cilium documentation — Native routing
- cilium blog — Understanding Cilium Network Performance
- ebpf website
To get your current cilium configuration, you can also check the cilium ConfigMap
kubectl -n cilium get cm cilium-config -o yaml

apiVersion: v1
data:
  agent-not-ready-taint-key: node.cilium.io/agent-not-ready
  arping-refresh-period: 30s
  auto-direct-node-routes: "false"
  bpf-lb-external-clusterip: "false"
  bpf-lb-map-max: "65536"
  bpf-lb-sock: "false"
  bpf-map-dynamic-size-ratio: "0.0025"
  bpf-policy-map-max: "16384"
[...]